Whittier Fertilizer Blog

Archive for Gardening

Spring Gardening Checklist

While spring technically begins on March 21, it is vital that you consider the climate zone of your current location, to determine the potential danger of frost. Most plants tend to thrive in frost free conditions, where the soil will be at least a couple degrees above freezing. When it comes to gardening, spring starts when the soil says so. There are a myriad of tools that you can utilize to help determine your current climate zone via zip code. If you think that your area has passed the danger of frost, then use a soil thermometer to double check. It is recommended that the soil is on average, 50 degrees Fahrenheit or higher. Once you know that you have passed the danger of frost, then you can prepare for spring gardening.

soil-test-for-spring-garden
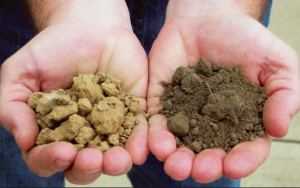
Surveying the yard and completing a soil test. If you have trees in your yard, make sure that their limbs aren’t overhanging on structures. This may require you to hire an arborist, especially if you have large trees. Remove last year’s perennial foliage, and inspect your drainage and ditches. Leaves and other organic and inorganic material tend to gather in the drainage area over the winter. Make sure that spring rains have a place to drain off by removing this debris. Spring seedlings need proper drainage for them to grow. Remove dead leaves, branches, and toss them into your compost. If necessary, refresh mulch in your planting areas. Before planting new seeds, check the pH of your soil with a home kit. Take several samples from different areas in your garden for an accurate reading of your yard’s overall health. You may need to add lime to raise the pH of your soil or elemental sulfur to reduce it.

Remove seedling-killing weeds. Weeds are the worst enemies of young plants as it robs your garden of proper nutrients. Particular weed strains can be fast-growing, quickly overshadowing your growing plants, potentially killing them. Even though you should be diligent of weeds even during the cooler months, chop off current weeds right below ground level.

Consider pruning. If you have neglected your garden, then your yard may look under the weather. For your spring garden, prune your flowers, shrubs, and trees. By pruning, you are supporting new growth, as well as encouraging flowering plants. If self-pruning, make sure that you cut at a 90-degree angle, right in front of a leaf cluster. Cut us close to the part that you want to keep, without actually cutting into it.

Preparing new beds for planting. After removing debris and weeds, spread about 4 to 5 inches of compost over the soil, then use a spading fork to cultivate up to a foot deep. Transfer container plants into the appropriate hole of suitable depth. You may want to consider planting:

  • Spinach. It grows quickly and is surprisingly handy when it comes to cooking. There are a large variety of spinach plants, but most are of the crinkled or curly leaf variety. If this is your first time with spinach, then you can mix the variety to compliment the theme of your garden.
  • Radishes. One of the more fast-growing vegetables that you can grow. Radishes can be harvested in just a couple of weeks after being planted.
  • Peas. Take about 50 to 65 days to mature, and make a great spring vegetable that is works with most palates.

If you live in an area that tends to have an intermittent or irregular frost season, then consider planting frost-resistant plants. This includes sweet peas, rose mallow, and sweet alyssum. For tolerant vegetables consider broccoli and cauliflower. It is best to screen newly planted seeds with a cover, or keep them potted indoors, until you are confident that the frost season has passed. Consider adding an extra layer of protective mulch, as it is a useful protector against the sting of icy weather.

Posted in: Gardening

Leave a Comment (0) →

The Difference Between Marathon Sod I, Marathon Sod II, and Marathon Sod III

As you consider which sod to choose for your home, community area, or corporate space, there are a number of factors to consider. Marathon Sods are a popular option, but with 3 different varieties, they can seem confusing.

sod marathon I 1

sod marathon I 1

Marathon Sod I

Marathon I is popular due to its durability and beauty. Of the three types of Marathon sod, it is the most well-rounded. The sod grows and recovers quickly, so it can handle daily traffic that might damage the other types of Marathon sod. As a result, this year-round sod is popular for family yards and recreational areas because it doesn’t show wear and tear as quickly as the other varieties. With a pleasant medium green color, the sod should be maintained at a height of 2.5-3.5 inches.


sod marathon II 2

sod marathon II 2

Marathon Sod II

Although Marathon II is an advanced development of dwarf tall fescue, it is still quite durable, which allows it to be cut shorter. In addition, it is very dense and is even disease resistant so that you don’t have to worry as much about the health of your yard.

Marathon II does grow more slowly than Marathon I, but it grows quickly enough to still offer a good recovery rate. Consequently, it can withstand regular activity and traffic as long as it is not on a daily basis. With a medium to coarse texture and a pleasing deep green color, Marathon II can look appealing all year long. Most experts agree that it should be kept at 2-3 inches.


sod marathon 3

sod marathon 3

Marathon Sod III

Marathon III is the most delicate of these varieties. With a finely leafed consistency, it looks completely natural. It is extremely dense and has a dark, rich shade of green. Although it is very attractive, it also grows slowly.

Since Marathon III grows so slowly, it is not ideal for families. Many residential and community areas prefer it, but it simply cannot handle the traffic caused by children. Its popularity comes from the fact that it requires the least maintenance, since you don’t have to mow it as frequently. However, the slow speed of growth also means that brown or damaged spots are visible for longer. If you don’t expect to perform lots of activities on your sod, Marathon III is a cost-effective, attractive option.

There will be distinct advantages and disadvantages to whichever Marathon sod you select. Carefully consider how much time you expect to spend walking and playing on your grass so that you can choose a variety that will stay attractive and healthy throughout the year.

Posted in: Gardening, Landscaping

Leave a Comment (0) →

What Are the Different Type of Decorative Bark and How are They Used

decorative-bark-in-yardAt Whittier Fertilizer, we offer a wide variety of decorative bark that also serves a number of practical purposes. If you are debating which kind of bark is appropriate for your needs, examine the advantages of some of our most popular types of decorative bark below.

Small Bark
Although small bark can be used effectively as a general ground cover that introduces extra nutrients and prevents the growth of weeds, it is often chosen as an appealing option for walkways within your landscaping.

Medium Decorative Bark
For an interesting, bold effect, try using medium decorative bark in your yard. Medium decorative bark not only looks attractive, but it also acts as an insulator for the ground so that the roots of your plants are protected from harsh heat or chilling cold.

Mini Nugget Bark
If you are designing a small section of landscaping, mini nugget bark may be ideal for your purposes.

Three-Inch Cover Mulch
This type of mulch allows you to create definition in your landscaping efforts. In addition, it discourages weed growth by covering the empty spaces in your garden. Three-inch cover mulch provides an extra dose of nutrients to your yard while also retaining moisture so that the ground doesn’t dry up and cause your plants to die.

Fine Cover Mulch
Fine cover mulch offers a thorough, healthy way to define your landscaping and contribute extra nutrients to your garden. This type of decorative bark is also useful for guarding delicate plants from weeds and heat.

Gorilla Hair Bark
To gain the nutritious advantages of mulch while creating a unique looks and smell for your landscaping efforts, try gorilla hair bark. Made from redwood trees, gorilla hair bark is popular thanks to its ability to slowly distribute water to plants without letting the water evaporate too quickly.

Playground Woodchips
As evidenced by the name, this form of decorative bark is intended for use as a groundcover for playgrounds. Use playground woodchips as a safe, inexpensive, and attractive option for your playground area.

Red Chips
Besides the typical benefits of decorative bark like suppressing weed growth and offering protection from the elements, red chips provide gardeners with an easy way to gradually increase the health of their soil as the red chips decompose and add organic matter to your beds.

Shredded Bark
Many gardeners prefer shredded bark because it provides great protection for your plants from extreme weather. In addition, it offers a classic, rustic look as an accent in your garden or to define your pathways.

VIEW OUR SELECTION OF DECORATIVE BARK

Posted in: Gardening, Landscaping

Leave a Comment (1) →

Preparing Your Garden For The Winter Months

When spring has sprung and the garden is showing signs of new life, the steps that were taken the previous autumn to prepare it for the winter months will be evident. Winterizing a garden, just like winterizing a home or an automobile, doesn’t take a great deal of time or effort, and the benefits far outweigh the time and effort spent.

The end of the growing season is the ideal time to take photos or make drawings of the garden layout, marking the location of perennials so as not to inadvertently disturb them before they return next spring. This is also a good time to decide what worked out well in this year’s garden configuration, what should be repeated next year and what should be replaced with something different.

Out With the Old, In With the New

Fall is the time to clean up any debris in the garden, removing the annuals after they have completed their growing cycle, and discarding leaves, weeds and any unhealthy or unwanted growth. This will insure the winter garden doesn’t harbor unwanted insects or other pests. This is also the time to plant flower bulbs expected to bloom in the spring. Putting a layer of gravel in the bottom of the holes dug for bulbs will help protect them from rodents and a layer of good topsoil will offer protection from the winter cold.

Fertilizer, Mulch, Compost and Topsoil

Once the current growing season has ended, the soil will likely be depleted of many essential nutrients and these need to be replenished. Soil should be tested for pH and adjusted accordingly. Acidic soil, which has a pH level below 6.0, should be given ground limestone. Alkaline soil, with readings of 7.5 or more, should have soil sulfur added.

One simple and easy way to replenish nutrients into garden soil in the fall is to add organic compost, which consists of dead organic material such as hay, straw, leaves and grass clippings. A good organic fertilizer containing blood meal will add nitrogen to the soil, promoting lush, green growth next year and is especially good in soils with low pH levels. Adding compost and organic fertilizer in the fall allows them time to decompose into the soil completely during winter.

A two- to four-inch layer of MULCH placed over the TOPSOIL (after weeding has been done) is ideal for keeping weeds abated, protecting the ground from the cold, helping retain moisture and deterring soil erosion. It also looks better in a garden than bare soil and will slowly release nutrients into the ground.

Mulch can be bought or made at home from shredded leaves, bark, grass, sticks or other organic material. Since mulch is meant to be protective and decorative, not mixed into the soil, there is an almost endless list of materials that can be employed, from asphalt and oyster shells to sawdust or wood-chips. These winterizing steps will ensure a healthy and easy to care for garden next growing season.

Posted in: Gardening, Landscaping

Leave a Comment (0) →

Tips for Using Compost

For those looking to enhance the overall quality and health of their garden, yard, or entire landscape, the proper use of compost can greatly help. Organic compost is essentially a mixture of decomposition that provides the necessary nutrients and bacteria for plants to survive. Because it is such a fundamental material for plant growth, both residential garden hobbyists and commercial planters and farmers find compost useful to their efforts. And, while it will do most of the work for you, there are a few ways to make sure you are getting the most out of your compost.

organic-compost

Tip #1: Use Your Compost as Tea

After reading the first tip, you are probably a little grossed out, but no, the tea is not for you to drink. Compost tea is an old method for using the best of the compost nutrients for potted plants with no room for more soil. You can make compost tea by first filling a burlap bag with compost. Think of this as the equivalent of a tea bag when making hot tea to drink. You will place this bag in a bucket of water and let it sit for an hour to an hour and a half. Once the time has passed, remove the bag and use the liquid to water your plants. The contents of the bag can then be dumped into the garden and used as compost mulch.

Tip #2: Keep Compost Away From Plant Stems

When using compost as mulch in your garden, it is best to keep the compost away from the stem of the plants. It is suggested to leave two to three inches of space around them.  The idea is to let the nutrients from the compost soak into the soil, without stealing nitrogen from the plant’s root zone. Another reason to do so is that wet compost can easily transfer diseases and pests to your plants.

Tip #3: Be Careful Not to Introduce Weeds

If you are using your own compost, or are uncertain about its original source, be sure to examine it before adding the compost to your garden or landscape. Compost piles can be an excellent place for weeds and insects to thrive, so you want to make sure you aren’t inadvertently adding weeds to your garden.

Tip #4: Choose Whittier Fertilizer

With Whittier Fertilizer, the good news is that tip number three is not an issue. Whittier Fertilizer uses only premium organic compost with the top air-to-water ratio. When you choose Whittier Fertilizer, you can rest assured you are putting only the best into your garden.

– See more at: https://whittierfertilizer.com/resources/compost-los-angeles-tips/#sthash.Vef6XgvZ.dpuf

Posted in: Gardening

Leave a Comment (0) →

Soil Amendments – What are they used for and what type of amendments should you use?

Gardeners, landscapers, and farmers alike can increase growth and appearance of plant life by introducing amendments into the soil. Amendments are organic or inorganic materials added to soil to ameliorate its physical characteristics, such as:

  • Structure
  • Aeration
  • Water infiltration
  • Drainage
  • Permeability
  • Water retention

By improving these qualities, soil amendments can help compensate for deficiencies in the native soil, such as density and low nutrient holding capacity. When utilizing amendments correctly, commercial and home users alike can expect robust plant growth, enhanced color and vitality, and reduction of undesirable conditions such as weeds, diseases, and rot.

What Types of Soil Amendments are Available?

Soil amendments fall into two main categories: organic and inorganic. The distinctions between the two types of amendments include:

  • Organic amendments are created from formerly living organisms, such as grass clippings, wood chips, manure, compost, saw dust, biosolids, and wood ash. They also increase the proportion of organic matter content in soil, improve soil condition, and can work as organic fertilizers. Organic amendments also provide nutrition for earthworms, fungi, and bacteria living in the soil.
  • Inorganic amendments such as tire chunks, sand, pea gravel, perlite, and vermiculite are either man-made or mined.

Whittier Fertilizer offers a wide selection of organic amendments to meet the needs of any farmer, gardener, or landscaper. Depending on your planting needs, choose from options such as:

  • Manure. Ideal for landscaping and backyard gardening, manure-based amendments have been composted and treated over time to manage ammonium content and remove harmful bacteria. They contribute to healthy plant growth by providing nitrates, magnesium, phosphate, potassium, and other trace elements.
  • Organic compost. This rich soil amendment is formed by the decomposition of living plant materials. It contains vital microorganisms that nourish soil and encourage growth. Use organic compost for fertilization, weed control, landscaping, planting, potting, and more.
  • Soil mix. A custom combination of finely screened sandy loam soil and other organic ingredients, soil mix provides proper nutrition and optimal draining properties to soil.
  • Worm castings. This mixture contains bacteria, enzymes, plant matter and manure. The easily absorbed nutrients in worm castings mix enhance the health and appearance of plant growth, as well as prevent disease.

How to Use Soil Amendments

Some possible uses for soil amendments in gardens or landscaping include:

  • Sprinkling on new lawns to enhance growth and color
  • Adding to soil around rose bushes and trees
  • Combining with the soil of indoor potted plants
  • Placing at the bottom of planting holes to nourish seeds and transplants
  • Mixing into the soil of flowers and vegetables
  • Incorporating into the soil of raised beds

For the best results, amendments must be thoroughly mixed into the soil.

At Whittier Fertilizer, we are committed to helping you make the best choices to create healthy, strong, and productive plants. We offer custom mixing of all our products to ensure fertilizer products meet your unique needs. For more information about soil amendments, call us at (562) 699-3461 to speak with one of our specialists.

– See more at: https://whittierfertilizer.com/resources/soil-amendments-for-your-yard-and-garden/#sthash.3jOeWUCl.dpuf

Posted in: Gardening

Leave a Comment (0) →

Starting Seeds 101: When and How

Both seasoned and emerging gardeners are often confused about seed starting, especially because this process takes place indoors, oftentimes during the cold winter months. The confusion is compounded by the fact that different locations have different climates, which means someone starting seeds in California will have a completely different experience with seed starting than someone in Montana. The appropriate time to start seeds also depends on the type of plant you are trying to grow. Read on for tips on how to decide when to start seeds from the landscaping experts at Whittier Fertilizer.

Factors to Consider When Starting Seeds

While starting seeds indoors may seem complicated, the benefits are many, including earlier fruits, vegetables, and flowers, as well as the vast expanse of options available when choosing what to grow. Plants will also prove to be of a higher quality and, ultimately, cost less in the long run. There are a few logistical considerations to take into account, however.

First, choose the right container for your seeds. Options for this include sections of a market pack, individual pots, or open flats. It’s usually best to separate the seeds into individual containers so you don’t have to disturb the roots of each plant as you transplant it into your outdoor garden.

Second, consider the kind of substance you’re planting in. Regular garden soil will not work for starting seeds for a number of reasons, primarily because it will harden into a mass that can kill fragile young roots, especially in a compressed space like in a small flowerpot. Consider an organic, soil-less substance like planter mix that includes peat moss, perlite, vermiculite, and other organic matter.

Timing the Planting Process

Again, it all depends on what you’re planting and location. Fortunately, seed companies often include instructions for growing each individual plant. However, if you’re getting seeds from a distributor that doesn’t label their packages, or if you have a seed package that has lost its label, it can be extremely useful to separate and categorize by plant type. Here are some of the plant types to keep in mind as you start your seeds indoors.

Many flower species need stratification, which means they need time in the freezer, in order to properly germinate. This process mimics the frost they would experience out of doors. Most flowers should be started indoors and then sown directly into the ground. Similarly, herbs should also be seeded indoors and then sown. Nightshades like eggplant and tomatoes, as well as leafy greens like cabbage, lettuce, and kale, should be started indoors and then transplanted.

For more information about when to start each different kind of plant and how long to wait to sow or transplant, here is a seeding chart provided by Common Sense Homesteading; www.commonsensehome.com/wp-conte … Charts.pdf.

Caring for Seedlings

While most seeds don’t need light to germinate, they will definitely need sunlight or grow lights in order to grow properly and avoid becoming weak or “leggy.” Temperature is another factor to consider, and when starting seeds, refers to soil temperature rather than air temperature. The rule of thumb is about 78 degrees Fahrenheit, but different seeds require different temperatures. Finally, consistent moisture and humidity is important. Keep your starter soil moist but not soggy and the humidity level at about 60%.

Once your seedlings have grown their second set of true leaves, the fertilization process can begin. You can learn more about fertilizers at Whittier Fertilizer.

– See more at: https://whittierfertilizer.com/resources/starting-vegetable-plants-from-seeds/#sthash.Ud7ppfjc.dpuf

Posted in: Gardening

Leave a Comment (0) →

Growing Luscious Tomatoes in Your Garden

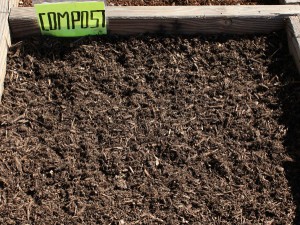
Tomatoes, one of the most commonly grown plants in home gardens, are easy and simple to cultivate and, with just a little attention to detail can be made to produce a fine, luscious crop which can be consumed in any number of ways. They can be eaten raw, added to salads, cooked into a variety of dishes, canned or bottled for later use, or made into different types of sauces or drinks. There are literally thousands of varieties of tomatoes from which to choose and these prodigious plants, native to South America, can be grown in nearly any climate. Tomatoes, like their common garden brethren the zucchini, often grow to produce huge amounts of edible fruit, allowing the successful cultivator a surplus that can be shared with others.

Easy Tomato Growing Tips

Whether one lives in a colder, northern region of the country, the hot, arid southwest or somewhere in between, there are tomato varieties just right for them. In areas with a short growing season, choose early-ripening varieties such as Early Girl, SunGold or Pixie. For areas with an extended growing season, opt for Golden Boy, Wonder Boy, Beefsteak, Oxheart or any type of cherry tomato. A local nursery will know which types grow the best in each area.

Seeds can be started directly in the garden, but starting them indoors will give a jump on the growing season and protect them while they are at their most vulnerable. They will do best in an area of full sunlight in well-draining, fertile soil with a pH level of about 6.5. Employing a good mulch and compost or organic fertilizer will help them do their best. Mulch will help inhibit weed growth and prevent water loss. Tomatoes require adequate water and sunlight, but should be protected from direct sunlight during the hottest part of the day.

To protect tomato plants from bug infestation, certain companion plants can be located nearby. Good candidates include chives, garlic, marigolds, mint, onions, peppers and parsley. Sticky traps can also be employed. A homemade red pepper/onion/garlic spray may also be used to ward off undesirable insects. As an alternative, ladybugs can be introduced to eat aphids and their eggs.

Splits in tomatoes are fairly common and can best be avoided by controlling their growth rate with an even, regulated amount of watering and nourishment. If they are allowed to grow too quickly by over watering or over fertilizing they will be prone to splitting. Split tomatoes should be picked immediately.

CLICK HERE TO READ ABOUT GREENALL TOMATO FERTILIZER

Posted in: Gardening, Landscaping

Leave a Comment (0) →

Preparing Your Garden For Spring

Vegetable Garden with Lettuces
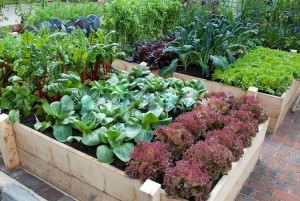
Preparing a raised bed garden for spring planting is very important to getting the highest quality plants and vegetables. A raised bed garden needs to be worked like other gardens to make sure that the soil is ready for planting. This also means that the right mulch should be used to keep unwanted weeds from taking over a raised bed garden. There is a simple checklist that should be followed when preparing a garden for the spring to keep everything in order. Before spring planting takes place it is important to make sure everything is ready to go to avoid fixing anything during the growing season.

The first thing that should be looked at when preparing a raised bed garden is the bed itself. Beds should be inspected to see if any repairs are necessary. Winter months and water can take a heavy toll on raised beds and they should be checked before planting. The most common problems with the beds are in the corners. This can be fixed by using screws to get the corners connected tightly again. Bowing of the sides is another common problem experienced with raised bed gardens. Most bowing of the sides can be taken care of with the addition of a stake on the outside of the bed to screw in the side.

The next thing gardeners and planters should do with raised beds is to pull or block roots from other plants. Weeds can take over a garden so it is important to get the entire plant out of the ground to prevent it from growing back. Roots from nearby trees can also dig their way into a raised garden bed so some digging around can help people find any tree roots taking up room in the garden. After all of the roots are taken care of, it is time to top off and till or fluff the soil. This makes sure that new plants have enough soil to grow in.

People who are using raised beds to grow crops should put stakes and trellises in for tall crops because they help support the vegetables. The soil should then be covered with mulch and fertilizers. This helps the soil keep in warmth and gets the soil ready for planting. Perennials should be divided and thoroughly mulched before the spring planting begins. After the garden is ready, wait until warm weather arrives to plant.

Posted in: Gardening, Landscaping

Leave a Comment (0) →

How to Create a Beautiful and Low Maintenance Yard

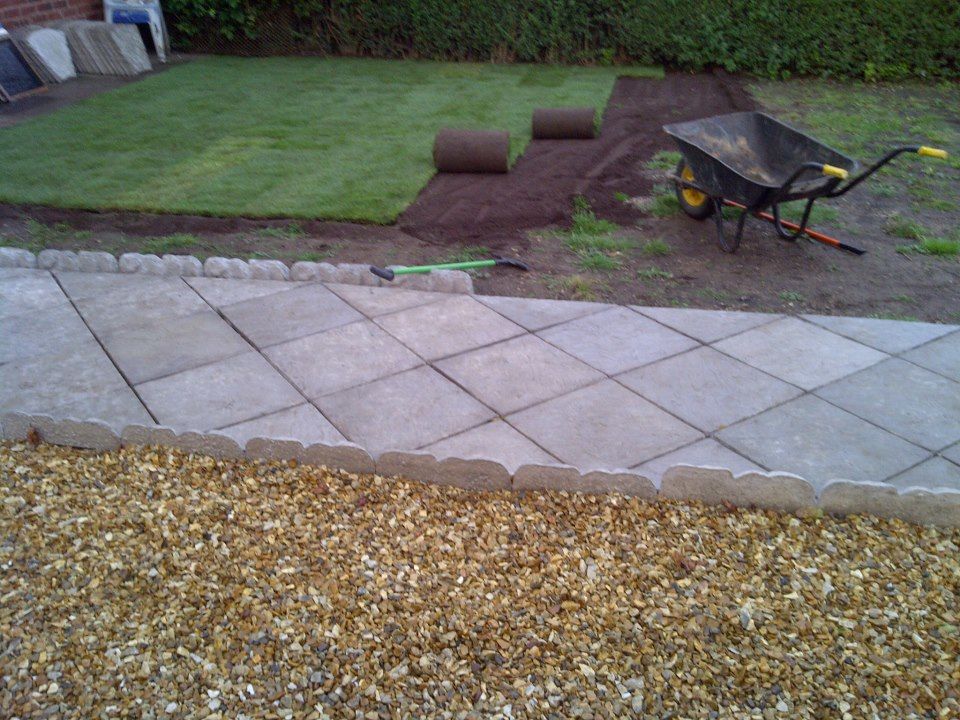
Many people are moving into homes that have been on the market a long time. These homes are in desperate need of a complete landscaping makeover. The years of neglect have taken a heavy toll on the lawn and garden. What could be better than transforming the front of the house into a wonderful garden for all the neighbors to see and enjoy? Landscaping around the patio and pathway to the pool is another good idea that will increase the appeal of the property. Undertaking such a task involves a lot of time and effort. Creating low maintenance gardens around the property will result in more time to enjoy them.

New homeowners should make a list of all the perennials that will be going into their gardens. Perennials are a perfect plant for any low maintenance garden because they come back each year. This is an important step toward a low maintenance garden. Replanting flowers every year defeats the purpose of keeping it low maintenance. Small bushes and shrubs that will grow around two feet tall are ideal for landscaping. Bushes and shrubs work very well around the pathways as well as in the flower gardens. With all the perennials, bushes and shrubs, any new homeowner will be confident that his lawn and garden will be low maintenance for years to come.

After planting all of the flowers and trees, new homeowners may realize that more work has to be done in order to keep this project low maintenance. By putting decorative landscaping bricks around their gardens, it will help keep the weeds and grass from overtaking them. This also helps the gardens look much more professionally done.

There will still be a risk of weeds coming up through the soil around the plants and shrubs. To stop this from happening, mulch is an excellent option. There are many different types of mulch to choose from such as the decorative red sierra mulch. This will make flower gardens stand out from the crowd. Not only will the mulch keep the weeds out, but it will also help keep the moisture around the plants and give them much-needed nutrients. Around the bushes and shrubs, consider taking on a natural look and choose compost. Organic compost is also a great fertilizer for freshly planted bushes and shrubs. Mulch and compost are a perfect compliment in a new homeowner’s low maintenance garden.

Posted in: Gardening, Landscaping

Leave a Comment (0) →
Page 3 of 3 123