Whittier Fertilizer Blog

Archive for Landscaping

3 Common Yard Weeds with Medicinal Properties

There are thousands of edible plants, some with surprising medicinal and restorative properties. While the ancients seemed to understand what these botanicals had to offer in terms of support for health and nourishment, we modern people are attempting to learn the why and how these plants provide some unique health benefits. The following three weeds are quite commonplace, and you might have even tried to eradicate them from your landscape. But, they have some outstanding medicinal properties that might even benefit your own health.

Dandelions (Taraxacum)

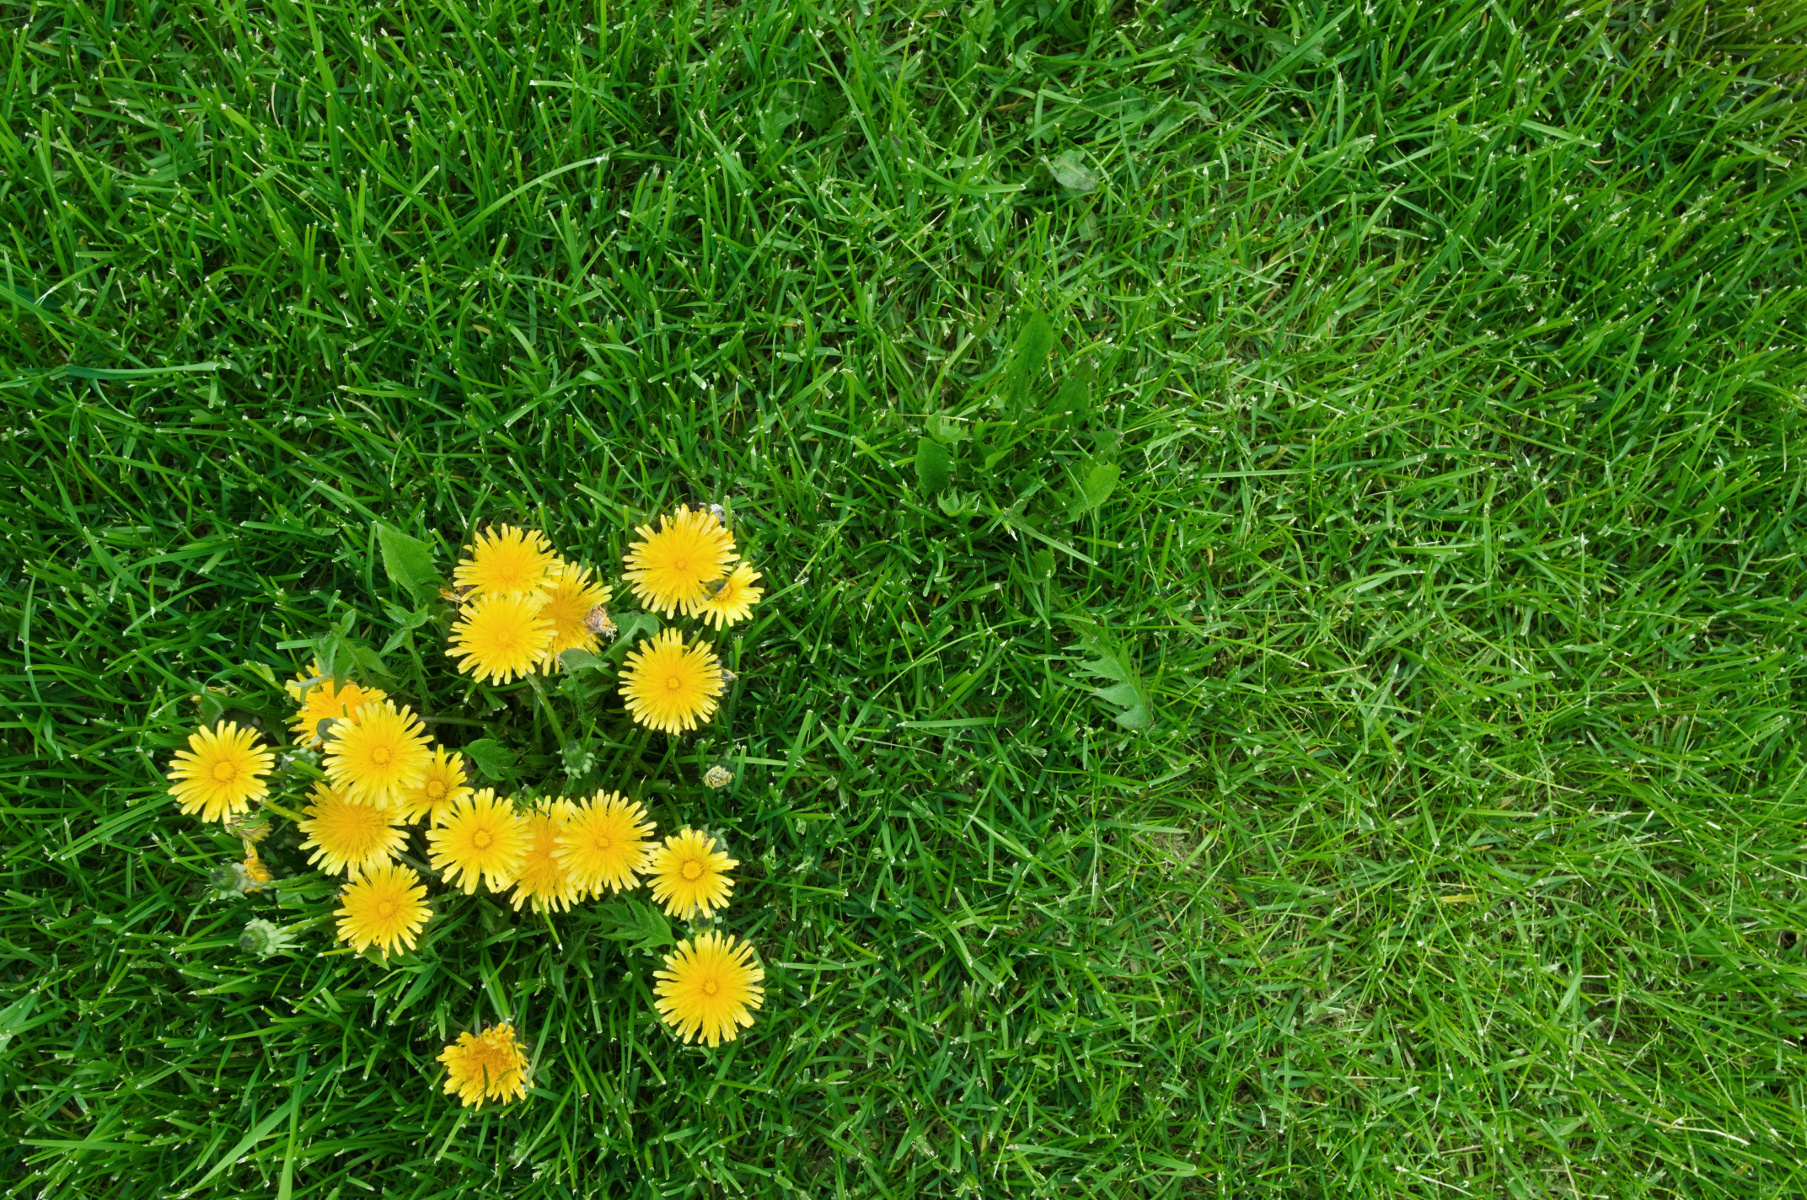
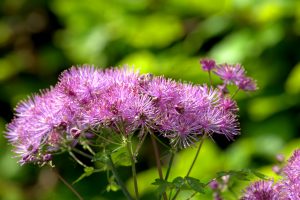
Dandelions are the bane of lawn lovers everywhere, but these weeds with their jagged foliage and bright golden heads are eaten routinely in many parts of the world. Not only are they nutrient rich, they boast medicinal properties. People frequently add dandelion greens to salads or dry the roots to make teas.

The ancient Chinese were the first to write about the healing qualities of dandelion. They prescribed this plant to treat indigestion and stomach inflammation. We know today that the bitter properties of the plant actually do stimulate the body’s digestive glands, promoting food digestion. According to research, dandelions may help promote healthy liver function, remove toxins from the body, control blood sugar, and even weight loss.

Stinging Nettle (Urtica dioica)

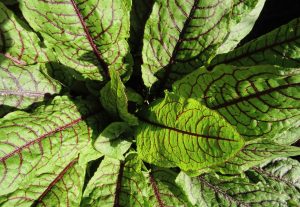
A lover of moist, fertile soil, stinging nettle is an unloved weed among gardeners but prized by folk medicine practitioners. If you suffer from conditions caused by inflammation like arthritis or gout, you may benefit from drinking teas made with stinging nettle. This weed is known to offer natural pain relief as well as antimicrobial properties.

Stinging nettle is rich in antioxidants, which may be why it is also so effective for treating inflammation associated with seasonal allergies. Although the evidence is not definitive, there is some research that suggests that stinging nettle blocks the body’s production of histamine, the chemical responsible for causing those unpleasant allergy symptoms like itching and hives. With its natural diuretic properties, stinging nettle boasts detoxifying properties that your kidneys and liver would surely thank you for if they could.

Purslane (Portulaca oleracea)

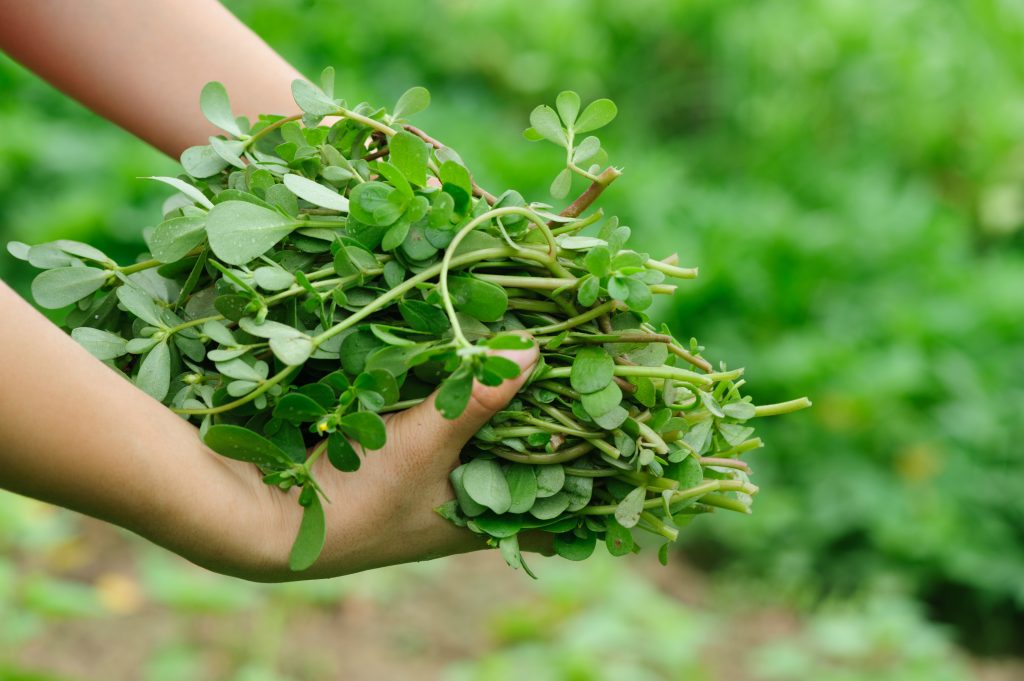
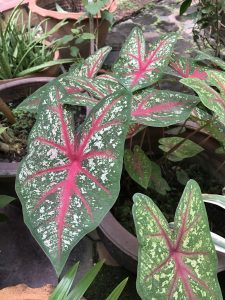
Noted as a tasty weed, purslane is both edible and nutritious. This weed may be eaten raw or cooked and produces a slightly salty taste that’s been compared to watercress and spinach. Purslane grows happily in gardens as well as in harsher conditions such as the cracks in sidewalks. High in vitamin A and vitamin C, this plant is also particularly rich in omega-3 fatty acids. As you may be aware, these fatty acids are known to help cut down the risk for coronary artery disease and life-threatening health emergencies like stroke and heart attack.

If you happen to be suffering from symptoms associated with arthritis or indigestion, the inflammation-fighting properties of purslane may provide you with some relief. In addition, scientific evidence suggests that this weed may also support vision health and alleviate bouts of insomnia.

Before you spray or dig up these weeds, you might want to think again. Many weeds like these offer surprising health benefits. While the scientific community is sometimes at odds with each other about some of these plants’ specific health benefits, people have been relying on them to treat a wide range of health complaints for centuries. Because they’re healthful and nutritious, you might just give them a try.

Posted in: Gardening, Landscaping

Leave a Comment (0) →

Why Fall is the Best Time to Plant Sod

Sod is a natural choice for property owners who want an instant lawn that’s lush, green, and healthy. Once in place, sod boosts the property’s curb appeal and possibly even its value! After all, a well-landscaped property supports property market value. With a new sod lawn in place, homeowners might be envisioning loads of outdoor living fun on their lawn–spring picnics and summer BBQs. But before you install your sod, be sure to note that the optimum time to plant sod is in early or mid autumn. Even as leaves begin to change colors and you feel those first cold snaps in the air, you’ll want to remember that fall is the ideal time to plant sod–and here’s why:

Fall Is the Best Time to Plant Sod

When you plant sod in the early or mid fall, it still has plenty of time to take root before the winter dormancy. Although you can theoretically lay sod during any season, depending on your climate, the autumn is ideally suited for this type of planting because of its cooling temperatures and increased precipitation. Adequate water and cooler temperatures mean less stress for sod as it begins the process of taking root. During the summer when temperatures are high and rain is sparse, sod will experience a more challenging environment. While homeowners can water regularly, rainwater is best with its natural nutrients that support optimum plant health.

Fall Sodding Is Convenient

If you’re installing sod yourself, it’s definitely more comfortable to install it on a cool fall day as opposed to a sweltering summer day. Moreover, you won’t have to ‘babysit’ your sod in fall the way you would during the spring and summer because you won’t have to water as frequently and you won’t be plagued by weed growth. Weeds are more rampant in the spring and summer months. Once your lush sod lawn takes root, it will be more effective at warding off weeds itself owing to its optimum health.

Fall Sodding Tips

After you install your sod, you want to promote its ability to establish itself. So, before you install it, be sure to prep your soil. Loosen it so that it’s conducive to the new roots that will be trying to establish themselves. Your soil should include organic matter to make the rooting process easier for sod. After planting you sod, you’ll need to check on it as moisture is important. As soon as you plant it, you’ll need to soak it well. On that first day, you should see footprints when you walk on it. That tells you that it has enough moisture.

During the next five to six days, you’ll want to slightly pull up a corner of your sod to make sure that the backing is damp. If you find that it’s dry, plan to water your sod for about 30 minutes to ensure it has the water it needs to support the rooting process. Although you do not want your sod to become waterlogged, you do want to check daily for that dampness that will tell you that your sod is properly cared for. Work with the weather; if you get rain, you should adjust your watering schedule.

With proper care and routine fertilizing, you can experience all the benefits that sod offers your landscape. To find sod and landscape supplies that are ideal for you, visit Whittier Fertilizer today.

Posted in: Gardening, Landscaping

Leave a Comment (0) →

How to Plant Perennials

Perennials are beloved garden plants for a myriad of reasons. Not only are they beautiful, interesting, and come in a wealth of varieties; they keep coming back season after season if you fulfill their care needs. Many perennials are low-maintenance and long-blooming. With Southern California’s warm and sunny climate, many types of perennials thrive there. Use these plants to boost your home’s curb appeal and enhance your landscape with natural beauty.

Consider Your Climate

For perennials to survive from one year to the next, they need a climate that supports their survival needs. Southern California provides a welcome climate for a wide range of plants, but it’s not ideal for all types of perennials. The region is routinely dry and not prone to heavy rainfall. Many tropicals, for instance, need a moist climate in order to thrive. Southern Californians can grow many moisture-loving plants, but they must ensure that they see to the plants’ moisture needs. It’s important to consider each perennial’s preferred climate before you introduce a specific plant to your landscape.

Perennial Care

Remember, perennials will need some care. Consider each plant’s care needs to determine if you want to have it in your landscape or garden as you’ll need to provide for it. For low-maintenance plantings, choose native perennials that are suited to the climate. These types of plants will not require much effort on the part of the gardener except for some basic care needs such as dividing, cutting back, or watering in types of severe drought.

Best Perennials for Southern California

Consider choosing perennials that will add both color and texture to your landscape. The following are some low-maintenance options that are likely to thrive on your Southern California property:

  • Sea lavender
  • California fuschia
  • Hens-and-chicks
  • Santa Barbara daisies
  • Yarrow
  • Penstemon
  • California poppies
  • Desert globemallow
  • Hummingbird sage
  • Yellow stonecrop
  • Tiger Lilies
  • Meadow lupine
  • Coast dudleya
  • San Diego yerba buena
  • Giant wakerobin
  • California coneflowers

Of course, there are thousands of perennials to consider.

Planting Your Perennials

Before purchasing perennials online or at your local garden center, read about the plant’s care needs. First, will it tolerate full sun or does it require some shade? You’ll want to select plants for specific locations in your landscape. If you have a shady landscape, sun-loving perennials are not ideal. Of course, with its seemingly endless sunshine, Southern California caters to perennials that do well in full and partial sun. If you have a sunny landscape, you’ll have a wide range of perennials to choose from.

Also what are the plant’s soil needs? Many perennials will thrive in a well-draining soil. However, not all perennials will do well in a sandy soil. Consider the type of soil on your landscape. You may have to amend it by installing more planting soil or you could plant your perennials in containers filled with good soil. Don’t forget to consider the plant’s water and fertilization needs. Again, if you stick to perennials that are native, you won’t have to over-worry about their maintenance.

Evaluate your landscape and choose plants that are ideally suited for your microclimate as well as your aesthetic preferences. You might install a single-color landscape or fragrant garden. You’ll want to choose perennials of various heights to ensure plenty of vertical appeal for your landscape. You might even opt for climbing plants to create privacy screens for your patio area. With these suggestions in mind, you’ll be ready to enhance your landscape’s design with perennials that are ideally suited to Southern California’s climate.

Posted in: Gardening, Landscaping

Leave a Comment (0) →

Top 10 Most Beautiful Shade Tolerant Plants

While many annuals and perennials crave sunshine and need a sunny location for optimum health, there are a number of plants who not only tolerate shade well–they actually prefer it. If your landscape contains numerous trees and contains a wealth of shade, you’ll want to choose plants that thrive in these types of conditions. The following are among the most gorgeous and interesting shade-tolerant plants to consider.

Astilbe Hybrid

Astilbe Hybrids

Astilbe hybrids are perennials that boast fern-like foliage and delicate, shower flowers in shades of pink, red, or white flowers. Shade gardeners love them for the splash of color and unique texture that add to the landscape. These plants prefer humus-rich soil that’s routinely moist (not waterlogged) and light to moderate shade. Too much sun scorches the plant’s foliage.

Coleus

Coleus (Solenostemon scuttellarioides)

Outside of the tropics, coleus plants are grown as annuals to add vibrant foliage to shady settings. Available in a dazzling range of hues, including hot pink, red, purple, black, and cream, coleus thrives in part shade and prefers moist but well-draining soil. Showiest examples of coleus include ‘Marisposa’ and ‘Ruby Ruffles.’

Garden Hydranga

Garden Hydrangea (Hydrangea macrophylla)

Renowned for their big, long-lasting blooms, garden hydrangeas bring old-fashioned charm to any garden. These deciduous shrubs sport large leaves and clusters of flowers that may appear white, blue, purple, or pink depending on the pH of the soil. These shrubs thrive in partial shade and require consistently moist soil and annual pruning to ensure optimum health.

Impatiens

Impatiens

Among the most popular annuals, impatiens are shade-loving flowers that come in a medley of hues that include red, pink, yellow, and white. Impatiens require daily watering–and sometimes twice a day when conditions become extremely hot. No deadheading is required.

Meadowrue

Meadowrue

Meadow rue, specifically ‘Lavender Mist,’ features stunning purple blooms tinged with yellow accents and purplish stems. With its upright growth habit, this herbaceous perennial will add vertical interest to your garden. It prefers partial to full shade and moist, well-draining soil. At maturity, this plant can reach three feet in height and width of 24 inches, so be sure to afford it with the room it needs to thrive.

Heucherella

Heucherella

Also known as coral bells, heucherella come in a wide array of varieties, most of which thrive in shady conditions. Celebrated for their distinctive foliage that comes in colors like purple, lilac, green, and even copper, these plants also sport delicate blooms in multiple colors. Easy to care for, these reliable perennials prefer well-draining soil.

Persian Shield

Persian Shields

Perfectly dazzling with their nearly metallic purple foliage, Persian shields are ornamental plants that are grown as annuals outside of tropical locations where the plants are native to. They prefer partial shade and thrive in moist, humid conditions. They love organically rich, well-draining soil. When they’re happy, they can grow as tall as three feet.

Begonia

Begonia (Tuberous)

Renowned for their vibrantly hued blooms, tuberous begonias provide season-long blooms and thrive in shade locations. These plants feature flowers in a myriad of colors such as salmon, yellow, white, orange, and red. They’re popularly displayed in hanging baskets or containers on porches or patios. They prefer fertilized, well-draining soil. Allow the soil to become slightly dry before watering.

Blood Sorrel

Blood Sorrel (Rumex sanguineus)

Blood sorrel is a herbaceous perennial that features arresting pale green foliage veined deeply with crimson. These plants will thrive in partial shade and are popular choices for water gardens and pond settings as they prefer moisture-rich soil.

If you have a shady landscape, consider these plants to adorn your setting. Their care needs are minimal and they’ll add loads of visual interest to your garden.

Caladium or Elephant ear or Heart of Jesus or Angel wings.

Fancy-Leaved Caladium

With its big broad leaves adorned with colorful hues and veining, fancy-leaved caladium like Caladium x hortulanum prefer loose, slightly acidic soil and partial to full shade. Soil should be warm, damp, and well-draining to ensure optimum growth and plant health. During the cold months, bring the bulbs indoors to store until the next growing season.

Posted in: Gardening, Landscaping

Leave a Comment (0) →

Best Plants/Trees to Create Shade or Privacy in Your Yard

Your backyard is your haven, the place you go to unwind. When you’re landscaping, finding the right combination of trees and plants that provide shade and privacy can help you create the ideal spot for relaxing after a long week. Take a look at these top choices to give you the shade you want and the privacy you deserve.

1. Spartan Junipers
These elegant trees are ideal for smaller to mid-sized backyards, since they don’t require a lot of space to grow. Plant them in a row around the edge of your yard to provide great privacy, or line them up on a hilly property as an excellent windbreak.

2. Holly
You may think of holly as a holiday decoration, but you can grow almost variety of holly in just a little shade. Choose the Argentea Marginata variety to enjoy a privacy border filled with vibrant golden foliage.

3. Weeping Podocarpus
If you’re looking shade and privacy around a large property, consider this evergreen that grows quickly. You can plant single trees for spot privacy, or grow them about 5 to 10 feet from each other to develop a full tree fence. These trees are quite tolerant to drought, making them ideal for coastal locations.

4. Pyracantha
Train this evergreen shrub against a wall that faces north for quick growth, or let it stand on its own as a privacy hedge. The tiny, white flowers that bloom each summer turn to bright red berries in the fall.

5. Flowering Dogwood
These beautiful deciduous trees don’t grow very tall, but they delight every spring with their showering of pink or white flowers, which fall to reveal delicious shade. They turn a deep red in the fall to continue bringing color to your backyard.

6. Clematis
This climbing vine works its way up a trellis or fills in the gaps in your fence to provide solid privacy. With its beautiful large flowers, it draws attention to itself rather than to what’s happening inside your yard. Start with two-year-old plants for best results.

7. White Spruce
If you prefer evergreens and live in a mountainous climate (or want to feel like you do), white spruce is a great choice. It’s tolerant to many climate zones and extremely easy to care for, with dense foliage and lots of cones during the winter. This evergreen provides both shade and privacy.

8. Privet
Privet hedges are classics when it comes to establishing privacy, possibly because the plant grows so fast. With its dark green leaves, which are mostly evergreen in warmer climates, it’s an attractive hedge. Prune it carefully for the first couple of years to get the look and shape you want.

9. Southern Live Oak
This hardy tree grows quickly and is resistant to wind and pollution, making it a great choice as a shade tree — as long as you have a large enough backyard to accommodate its massive spread of up to 100 feet. However, the southern live oak doesn’t handle freezing temperatures well.

10. Buckthorn
This dense plant only reaches a height of about 7 feet as a shrub, so it provides excellent privacy without needing much in the way of trimming. You can also grow it successfully in pots as a small tree.

Choose the shade and privacy plants and trees that suit your climate and your own preference to make your backyard a truly appealing haven.

Posted in: Landscaping

Leave a Comment (0) →

Examining the Differences Between Different Types of Fertilizer

Many homeowners and avid gardeners understand the benefits of using fertilizer to the support the overall health of their landscape and garden. However, it’s not always clear why certain types of fertilizer may be ideal for some situations and not for others. Knowing the pros and cons of each type can help you select the ideal fertilizer for your unique setting.

For instance, should you choose a liquid or granule fertilizer? Learn more about the differences between different types of fertilizers so that you can choose the best products for your landscape and garden.

Granular Fertilizers

Dry fertilizers are typically offered in granules. Many granular products are often formulated with a mix of fertilizing materials. One of the great advantages of granular fertilizer is that it’s easy to store. In most cases, it can be kept in your garden shed, garage, or other areas of your home where you store your landscape and garden gear. Many gardeners and landscapers prefer to use granule because fewer applications may be needed to support plant health and nutrition. Granules offer a slow-release of nutrients, so they invariably feed plants and crops longer into the growing season. Granules are also ideal for use in pre-planting applications.

Of course, there are some drawbacks to granules that are important to note. For instance, granule fertilizer tends to have a high salt content. This can burn leaves and compel roots to steer well away from those important nutrients that it needs for good health. Gardeners should also note that fertilizer granules are not uniform in terms of content. This means that some granules may be less packed with nutrients than others. Finally, granules are not ideal vehicles for certain types of nutrients such as phosphorus. Certain nutrients can be more effectively delivered in a liquid fertilizer.

Liquid Fertilizer

Many gardeners and landscapers prefer to use liquid fertilizer products because they generally are much easier to handle and apply. In fact, liquid applications tend to be more uniform and can be used at the beginning for the season and for in-season applications. Liquid fertilizers tend to be quick acting—certainly faster-acting than granule fertilizers. Because they act quickly, they often produce an immediate effect, which can be gratifying when searching for signs of good health among landscape plants and grasses.

As with granule products, liquid fertilizers also have some disadvantages that are important to be aware of. First, liquid products typically require more frequent applications. Additionally, gardeners really have to follow the manufacturer’s instructions to the letter as errors can easily damage your plants. Liquid fertilizers are sometimes susceptible to volatilization, so they don’t store as easily as granules. Finally, some gardeners and landscapers may find it expensive to purchase equipment for applying liquid fertilizers; however, such equipment is typically a one-time investment.

Of course, you can always discuss your fertilizer needs with our helpful staff. We’re here to answer questions about our products and to help you choose the best ones to support your landscape’s health and well-being.

Posted in: Gardening, Landscaping

Leave a Comment (0) →

Small Trees Are the Perfect Accent to Any Home

Having a lawn with beautiful, healthy trees enhances the aesthetics of any home. If you’re looking for a great addition to your front or backyard, planting trees may be the way to go. Think big when it comes to envisioning the yard you want. However, aim small when it comes to selecting the size of your trees. Small trees are often the best choice for Southern California residents. Consider these reasons small trees may be the perfect solution for improving the exterior of your house.

Small Trees Are Adaptable

For urban areas of Southern California like Los Angeles, small trees can fit into yards that otherwise would seem awash in concrete and brick. It can soften and beautify small urban spaces. You can even grow small trees in containers and then place them on a patio or deck. Ultimately, small trees can adapt to most urban neighborhoods in ways large trees never could.

Small Trees Are More Affordable

When you are choosing trees for your yard, it’s smart to look at it as an investment. However, it’s also crucial to consider the costs along with the potential benefits. Smaller trees can offer the benefits that larger trees provide, but they are typically less expensive. That’s true on multiple levels. For example, smaller trees can be cheaper to buy initially, and they can also be more affordable to care for on a week-to-week basis. Because they require less water (and are therefore good for water conservation in California), that can also save at least a little money.

Small Trees Are Easier to Maintain

It’s much easier to care for most small trees than it is to care for larger ones. For example, small trees like compost, so fertilizing them can be as easy as putting organic compost in your yard. The compost can help control the growth of weeds and support nutrient-focused landscaping. Also, smaller trees require less clean-up and fewer gardening tools. The larger the tree is, the more it may take to clean up after it. On the other hand, small trees take fewer resources.

Small Trees Develop Faster

When you are in a hurry for a tree to grow in your yard, you may be pleased to learn that many smaller trees develop faster and require less fertilizer. For example, if you’re looking for a shade tree to help you beat the heat during hot Southern California summers, it’s only natural to want a fast-growing tree. Smaller trees can develop faster, and they also recover from the re-planting process more rapidly.

Small Trees Often Serve a Dual Purpose

Several small trees can benefit your yard in multiple ways. For example, a sweet bay tree is picturesque for a yard. If you put a few sweet bay trees in a container on your patio, that may help keep roaches away. You can also place the leaves from the bay tree in your home as a natural way to repel roaches. Small flowering trees can offer natural landscaping beauty. Small fruit trees can empower you to grow your own food.

Finally, small trees are sure to benefit any front or backyard. Also, well-cultivated trees may even help increase the value of a home if you have your eye on the long-term investment of being a homeowner. They can help you take charge of the care and keeping of your yard and your home.

Posted in: Gardening, Landscaping

Leave a Comment (0) →

Mistakes You Don’t Want to Make When Planting a Fruit Tree in Southern California

Few plants offer a sweeter return on investment than fruit trees. To ensure that your newly planted fruit trees provide the nourishment you crave in the future, you’ve got to give them the best possible start. Growing fruit trees requires considerable commitment—but most good things in life do too! When planting your Southern California backyard orchard or just a single tree, be sure to avoid these common planting and care mistakes.

Poor Planning

Poor planning is often the root of preventable problems. Before you pick out a tree and put it in the ground, take time to research carefully. Determine what types of trees are most likely to thrive in your microclimate. Moreover, carefully choose a planting site. This may require you to contact your local utilities to make sure you don’t plant above pipes or cables that could possibly be damaged by spreading tree roots.

Wrong Season

Planting a seedling in summer can be stressful for most trees and shrubs, but given the hot temperatures in this part of the country, it can be doubly stressful for a planting. To give your fruit tree the best possible start, plant it on a dry day in winter. The ground should not be saturated with water.

Adding Fertilizer to the Soil

Many a novice gardener has sabotaged their new tree by adding fertilizer to the soil during the planting phase. Fertilizer is helpful to your fruit tree down the road after it has had a chance to establish itself in the soil. Fertilizing too soon can be detrimental to your tree’s root system as it forms.

Over-Watering / Under-Watering

Providing your fruit tree with an adequate supply of water—no more and no less—may seem like guesswork, but getting the watering part right is essential to the health of your tree, particularly as it attempts to establish itself in your landscape. Keep in mind that young trees do need extra water—and they’ll need extra water during periods of hot, dry weather. During the rainy season, you likely won’t have to irrigate—and probably shouldn’t. You don’t want your soil to be waterlogged or your tree’s roots can develop rot.

Poor Staking

You will need to stake your new fruit tree. Some gardeners make the mistake of removing the stake from a tree that’s been grafted on dwarf rootstock; these trees should have a permanent stake support. On the other hand, a fruit tree with vigorous rootstock only needs to be staked until it is strong enough to support itself. Good staking prevents the tree’s roots from moving the trunk, which you don’t want. To ensure your tree grows straight and strong, stake it on the side of the prevailing wind; in other words, the tree should blow away from the stake.

Forgetting to Mulch

In most places, mulch is important, but in Southern California—it’s a must. Mulching ensures that your soil optimally retains nutrients and, so importantly, moisture. In Southern Cal’s arid climate, water will dissipate quickly into the air, but mulch keeps it locked into the soil, allowing the tree’s roots to have the time they need to adequately absorb it. Mulching also discourages opportunistic weeds and grass from competing for water and nutrients with your fruit tree. Opt for organic mulch materials for best results.

Get the best return on your tree investment by avoiding these mistakes. Your reward will be healthy fruit trees that deliver juicy fruit once they are mature.

Posted in: Gardening, Landscaping

Leave a Comment (0) →

How to Assess the Health of Your Tree

It can take years or even decades for trees to reach maturity, so as a homeowner, investing some time and energy into the health of your trees simply makes sense. After all, replacing a tree that’s been lost due to disease or pest damage is both expensive and difficult to do.

How Trees Grow

One of the reasons why trees are able to grow to dizzying heights and remain vibrant for many generations is the fact that trees grow in layers, and each of these unique layers plays a specific role in the health of the tree.

The outermost two layers of a tree are known as the bark, which serves as a ‘skin’ for the tree. The outer bark is tough and firm; it works to shield the tree from pests and extreme temperatures. Much like human skin, when the outer layer of bark is damaged, the cells surrounding the damaged area undergo physical changes, and over time, a type of callus forms to seal off the affected area.

By contrast, the inner bark is soft and pliable; it works to deliver water and nutrients from the trunk and branches throughout the tree. Beyond this layer is the cambium, which is the layer of the tree where most of the new growth occurs. These layers are what causes the appearance of distinctive ‘growth rings’ that are visible when a tree is cut down.

How Disease and Insects Impact Tree Health

Here in California, there are a number of threats to the ongoing health of our trees, including fungal diseases that are linked to fluctuations in temperatures as well as both drought and excessive watering.

A common disease is known as cankers; this is when the fungus enters the fragile inner layers of a tree through the bark, leading to a chemical imbalance which can cause the tree to become disfigured, shed large portions of bark, and eventually die. Fungal diseases are common in willows, beach, maple, and birch trees.

Another common threat to tree health is the Western pine beetle, which attacks previously compromised Coulter and Ponderosa pines. The beetles burrow deep into the tree, causing the bark to fall off and eventually starving the tree of the nutrients it needs to remain vibrant.

Signs Your Tree Is Sick

While many property owners believe there is something wrong at the first sign of shedding bark, many varieties of trees regularly shed off large pieces of bark as new, healthy layers develop beneath.

What is important to watch for is unusual bark shedding, such as bark falling off following a sudden temperature shift; extended drought; or when there are other signs that the tree isn’t healthy like dead leaves, cracked branches, or the development of cankers.

Protecting Your Tree With Mulch

There are some simple steps you can take to both keep your healthy trees in good condition and help revive trees that have suffered from weather stress. Stressed trees respond well when organic mulch is applied in the spring and fall to the soil at the base of the tree.

A high-quality mulch will provide your tree with much-needed nutrients while helping to protect against both overwatering and drought – two of the most common threats to tree health here in California.

To find the ideal mulch for your specific application, contact our tree health experts here at Whittier Fertilizer.

Posted in: Gardening, Landscaping

Leave a Comment (0) →

Drought Proof Trees for Your California Yard

Droughts come and go in southern California — but we live in a desert, so another one is always waiting in the wings. That doesn’t mean that you can only plant cacti and palm trees in your yard, though. Plenty of drought-proof trees can help make your yard beautiful while remaining drought-resistant and conserving water.

Take a look at these fast-growing trees that let you drought-proof your California yard.

Texas Redbud

Those pink flowers help give this drought-resistant tree its name. This hardy tree is a great choice as a street tree or a shade tree, and you can even grow it as a container tree, at least for a while. The redbud is a deciduous tree that grows rapidly, at a rate of about 2 feet a year. Give it a hand by adding soil amendments that help this tough tree retain water.

African Sumac

This graceful shade tree spreads widely across your yard as it soaks up the sun, and it has beautiful weeping foliage that moves softly in the breeze. Expect it to grow quickly, and be prepared to do a little light trimming to keep it under 25 feet high. While the African sumac, which is native to South Africa, loves deep watering, it remains tough when the weather turns dry, and its evergreen foliage stays full and lush year-round.

Burr Oak

When you plant a Burr oak, you’re leaving a legacy that your children will enjoy… and their children, and their children after them, as this majestic spreading tree grows for up to 150 years. Make sure you have plenty of space for this oak tree, also called the mossycup oak, to spread out, as its shady canopy can reach 30 feet in diameter. The striking leaves of this tree turn bronze and gold before they fall in the autumn, and it’s a welcoming home for all kinds of birds.

Desert Willow

Add beautiful, showy flowers to your landscaping when you plant the desert willow, a hardy tree that’s native to southern California as well as to Mexico and Texas. This low-branching, deciduous tree loves full sunshine, and the more it gets, the more it puts out its pink, white, lavender or rose-colored flowers that spread a light fragrance around your yard. You can plant the desert willow and (almost) forget it, as it only requires occasional deep watering, handling drought like a pro, as its name points out.

Blue Palo Verde

You’ve probably seen a lot of blue Palo Verde trees around, even if you weren’t aware of it because this SoCal native is a standard in drought-resistant gardens. Look for bright yellow flowers to bud in the spring, and don’t be surprised if you see a lot of birds and bees hanging around it. The Blue Palo Verde isn’t a great choice if you’re near the ocean, but full sunshine is no hindrance to it. Help it out a bit when you mulch around the trunk to prevent erosion and discourage weeds.

How to Care for Drought-Proof Trees

Drought-proof trees are hardy, but they still need the right fertilizer and amendments to stay healthy. For instance, the African Sumac an organic fertilizer or manure. In general, look for a fertilizer with a high potassium level because this enhances drought tolerance.

Posted in: Gardening, Landscaping

Leave a Comment (0) →

Organically Mosquito Proof Your Yard

Warm summer evenings are times when many people enjoy sitting out in the summer breeze and enjoying the quiet beauty of the season. The feeling of peace and quiet can go on for only a short time before the mosquitoes show up and ruin everything. Summer fun, during the day or night, is usually synonymous with attacking clouds of hungry mosquitoes. There are plenty of chemicals you could use to keep the bugs away, but it would be better to look into organic solutions that are just as effective.

Mosquito Repellant Plants

The idea of using chemicals to keep mosquitoes out of the backyard concerns many people, especially parents of small children. Instead of spraying chemicals, you can grow a wide variety of fresh herbs that will add a pleasant scent to your summer gatherings, and drive mosquitoes away at the same time.

Lavender

Lavender bushes make excellent organic mosquito repellents because of their refreshing aroma. Surround your yard with plenty of bright purple lavender bushes, and rub some of the purple flowers on your skin to help repel even more mosquitoes. Before offering fresh lavender to your guests as mosquito repellent, you should first make sure that no one is allergic to lavender.

Citronella

Most people recognize citronella as the ingredient in many of the natural mosquito repellents on the market. But did you know that you can grow citronella around your yard as a natural repellent all summer long? The best way to use citronella is to crush it up in great quantities and throw it in your summer evening fire. But it can act as a fairly effective repellent just growing around in your yard.

Peppermint

If you like the idea of your backyard smelling like peppermint then you are in luck, because peppermint is a natural repellent for mosquitoes and many other types of bugs. One of the consistent attributes about organic mosquito repellents is that they all have agreeable aromas, and peppermint definitely enhances that idea.

Basil

For many people, summer picnics include fresh basil on the table to enhance the taste of many foods. But fresh basil also has a scent that bugs, especially mosquitoes, cannot stand. Growing a lot of basil in your backyard has two positive outcomes. You have plenty of basil for those summer parties, and the mosquitoes will definitely not feel invited to your event.

Adding Herbs To Your Outdoor Fire

A nice fire is one way to keep mosquitoes away, but only for a short distance. If you really want to make use of that fire, then you need to add in a bundle of natural herbs that will drive the mosquitoes right out of your yard.

To make your bundle, you will need equal amounts of fresh sage, mint, and lavender. You should try to make the plants all the same length to make it easier to bundle them. Each bundle can have two or three branches of each herb. Tie the bundles together with twine so the entire bundle will burn to ashes. Make a few dozen bundles and put them in a box next to your next summer fire. As the fire burns, you and your guests can throw the bundles into the fire and enjoy a night without mosquitoes.

Posted in: Gardening, Landscaping

Leave a Comment (0) →

Growing Herbs in Warm Climates

Southern California has the perfect weather for growing herbs. Because it falls in zone 9 and 10 on the USDA Plant Hardiness Zone Map, the climate is idea for plant growth because most herbs thrive when they have plenty of sunlight. Most herbs need six to eight hours of direct sunlight, both in the morning and early evening. However, when the temperatures reach ninety degrees and above, the amount of sunlight can be reduced to about four hours in the morning. Also, you might want to provide some artificial shade as temperatures rise.

SOIL

The soil is also important when it comes to growing herbs. Herbs produce essential oils and the production of these oils can be drastically affected by the soil. Herbs like slightly moist but most importantly well-drained soil. Too much water and herbs tend to rot.

Much of the natural soil in zone 9 and zone 10 is sandy. Because of the sandy nature of the soil, natural fertilizers like manure should be used as a supplement.

FERTILIZING

To prepare your soil. place about a 2-3 inch layer of manure or compost over the top of the sandy bare soil. Using a shovel or trowel, dig it in about 5-6 inches, mixing well. In addition, a layer of peat moss will help keep the ph of the soil down and also aid in water and nutrient retention.

SPACING

How well air is circulated around your herb plants is also very important. How closely the herbs are planted to each other, will make a difference in how well your herbs grow. Beware of how closely you plant certain herbs. Some herbs do not mind being planted closely next to each other. Other herbs will need more space, in order to spread out.

COMPANION PLANTING

Herbs, such as sage, mint, marjoram, oregano or rosemary, need a little extra room to spread. With these herbs, you should allow for at least 3 feet between each plant. Other herbs like parsley, chives, and cilantro, don’t mind being planted closely together and can get by in a relatively small space. When planting your herb garden, keep in mind that some herbs, like mint or lemon balm, should be planted in containers to protect against their invasive nature.

CONCLUSION

Growing your own herbs can be a fun and relaxing experience. There is nothing better than using your very own home-grown herbs in the preparation of your food. If you live in a climate such as southern California, you have a unique opportunity to do just that. Take advantage of this and have some fun growing your own herbs.

Posted in: Gardening, Landscaping

Leave a Comment (0) →

Caring for your Avocado Tree Part 2: Diseases and Pests

Between homemade smoothies, skin care, and good old-fashioned guacamole, who doesn’t love a fresh, ripe avocado?

As much as we all wish that avocado trees could be a plant it, forget it, and harvest affair, caring for your tree requires consistency and vigilance. The health of your tree can and often does have a huge impact on your harvest during fruit-bearing season.

Here’s an overview of some of the most common diseases and pests that avocado tree owners have to be on the lookout for.

Diseases & Conditions

Sunblotch

Avocado trees that have been hit by sunblotch are often stunted in growth, discolored in the twigs and the bark, and, perhaps most importantly, yield discolored fruit. Even in situations where the tree doesn’t show a lot of symptoms, it’s not unusual for the annual yield to go down dramatically.

Treatment Options: Because sunblotch can’t be cured, tree owners have to focus on preventing it from spreading. Pruning tools need to be sanitized in bleach if they’ve been used on a sunblotch-infected area and if you can, using separate and uncontaminated tools for healthy trees is ideal. In situations where a single tree is at issue, it’s sometimes recommended that you destroy the infected tree to prevent spread to the others.

Cankers

You don’t have to be a tree whisperer to see when a tree is suffering from cankers. Not unlike a boil or a sore on human skin, trees with this condition often take a sunken appearance with sap and gum often dripping from the exposed areas. This may be merely unsightly if it’s just branches and trees affected, but if cankers develop in the trunk, this is a condition that could potentially kill your tree.

Treatment Options: Cankers require a multi-faceted approach to treatment. Pruning and removing dead and dying branches below the area that’s been infected is a good start along with being careful to seal the pruning cuts. To address the bacteria causing the cankers, fungicides are often highly recommended.

Fruit Rot

This is considered a fungal infection of the tree that usually happens as a result of unsanitary conditions and sometimes even from fruit that hasn’t been harvested quickly enough. You can tell when a tree is suffering from fruit rot when the fruit is wrinkling, showing brown spots, and falling before ripening.

Treatment Options: To salvage an avocado tree that’s infected with fruit rot, it’s recommended that tree owners remove the infected areas of the tree as soon as possible.

Common Pests

Mites

These pests aren’t always easy to spot visually, but the damage they do to leaves is undeniable. For those who are wondering why the falling leaves are considered such a big deal, it’s because the leaves are important to protecting the fruit from the damaging sun rays. If allowed to go unchecked, mite populations are capable of growing rapidly.

Treatment Options: The introduction of predator mites is one solution that’s available to tree owners, but the most effective treatment for mites is specialized horticultural oil.

Caterpillars

As it turns out, the popular image of caterpillars chewing through apples has a strong basis in reality. These creatures go after flowers, leaves, and fruit, and if they’re given free reign, they’re capable of destroying an entire avocado crop in practically no time at all. The speed at which they operate is a big part of what makes a caterpillar infestation particularly dangerous to your tree.

Treatment Options: Caterpillars can be treated with a bacterial spray called Bacillus thuringiensis. By taking care to spray the leaves and the insides of any buds, you can stop a caterpillar infestation dead in its tracks.

Thrips

This is a condition that results in scarred avocados and stunted growth depending on how serious the condition becomes. You will normally see these pests come during the earlier part of the season because they like to feed on growths and shoots while they’re still young and tender.

Treatment Options: Thrips try to seek moisture so stopping an infestation ultimately comes down to a combination of repelling the population on the avocado tree and removing alternative hosts. To combat thrips, it’s ideal for tree owners to pull out any grass or other plants near the avocado tree and to also apply a pesticide or oil and fat-based soaps designed to kill harmful insects.

Signs That Your Avocado Tree Could Have a Disease or Pest Problem

So we’ve talked about common diseases and pests that are capable of doing serious damage to an avocado tree. What a lot of these conditions have in common is the simple fact that if you catch the problem early, you have a much better chance at salvaging your tree.

Are there any signs to look out for? Is there some way to know if you should be suspecting a pest infestation?

Here’s a non-exhaustive list of symptoms to watch for:

  • Premature leaves dropping
  • Wilting leaves
  • Lowering fruit production and cankers
  • Poor growth
  • Yellow or red streaks on the twigs
  • Bark that’s peeling or cracking easily
  • White powder on bark
  • Mushrooms at the tree base
  • Brown spots or scarring on avocados

If you notice any or all of these occurring, it could mean that there’s a problem with the tree that requires further investigation.

Can You Save or Protect Your Avocado Tree From Pests or Disease?

The good news is that many of the conditions mentioned here can be managed and actively protected against with a strong regimen of pruning, careful containment of problem areas, and fertilizer.

Whittier Fertilizer has two products that will not only help your tree grow but will also promote higher yields in its Grow More Citrus & Avocado Organic Fertilizer and its GreenAll Citrus and Avocado Food. Both of these products are organic, consistent, and go a long way toward promoting and preserving the health of your avocado tree.

If you have an avocado tree, you’re in a better position than most to enjoy avocado-based sandwich spreads and chip dips all year-round. Protecting your tree’s health is essential to keeping those harvests healthy and plentiful.

Consider contacting us today if you have any questions.

Posted in: Gardening, Landscaping

Leave a Comment (0) →

Caring For Your Poinsettias This Holiday Season

Poinsettia plants are synonymous with the holiday season, and in many homes and businesses this festive plant is must-have for the holidays.

As a native to hot, tropical climates, poinsettias can be a bit tricky to care for during the cooler winter months here in Southern California. However, with a little care and know-how, you can keep your holiday poinsettias vibrant and healthy throughout the holidays and beyond.

Types of Poinsettias

There are over 100 known varieties of poinsettias, with bracts (colored leaves) ranging in color from the traditional bright red to pink, white, marbled (varigated), and even speckled. If you’ve noticed blue-hued poinsettias, those are actually white-bracted varieties that have been artificially dyed.

Each variety varies in size, bract shape and color, and even the texture. There are also unique variations in the stems of the plants themselves, providing you with a wide range of options when it comes to choosing your poinsettia.

Picking a Healthy Poinsettia

Look for plants that have broad, blemish-free bracts surrounded by lots of full green foliage that extends right down to the soil line. Regardless of the height of the plant, the foliage should be at least double the diameter of the plant’s pot.

Pass on any poinsettias that are wilting, have a moldy odor, or are sold in non-breathable plastic sleeves as these plants may already be diseased.

Preserving Your Christmas Poinsettia

When you first bring your poinsettia into your home or office, place it near a sunny south or east-facing window to maximize exposure to natural light. Water until the soil is moist, and avoid leaving the base of the plant sit in water to prevent mold from forming.

If your indoor space is dry, you may need to water your festive plant daily, and be sure to protect it against drafts that can lead to premature leaf drop.

After the holidays, you can extend the life of your poinsettia by following these tips:

  • Fertilize with a high-quality fertilizer to prevent calcium and magnesium deficiency
  • If you plan to keep your plant longer than a few months, you should re-pot it using planter mix that contains vermiculite (perlite) to ensure good drainage
  • Move your poinsettia outside in the spring into a partially-shaded spot
  • Pinch back all the stems by an inch or so to promote sturdy, healthy stems

Poinsettia Myths and Facts

  • As a member of the Euphorbiaceae, or Spurge family, poinsettias often leach a milky sap through their leaves. This sap can cause mild contact dermatitis among people who are sensitive to latex, which likely led to the widespread (and incorrect) belief that poinsettias are highly toxic.
  • According to Jay L. Hocker of the Mayo Clinic, poinsettias are not actually poisonous per se, however, they’re not exactly edible either. Researchers at Ohio State University studied the impact of poinsettia extract on lab rats, and they concluded that contrary to popular belief, it’s impossible to ingest a fatal dose of poinsettia leaves.
  • Although it’s always a good idea to keep plants away from small children and pets, the naturally bitter flavor of poinsettia leaves serves as a natural deterrent against curious kids, dogs, and cats.

By choosing a healthy, vibrant plant and following these simple care tips, you can enjoy the beauty of your holiday poinsettias throughout the winter.

Posted in: Gardening, Landscaping

Leave a Comment (0) →

Firescaping Your Yard – How to Use Fire-Resistance Landscaping to Protect Your Yard

Looking to create a warm, welcoming landscape around your home that’s easy to maintain and free from highly-flammable plants and materials?

While you can’t control Mother Nature, you can help improve the odds that your home will survive a wildfire by using fire-resistant plants and building materials in your yard.

Also known as ‘defensible landscaping’, the idea behind firescaping your yard is simple – replace all the highly-flammable plants and hardscape materials with flowers, shrubs, and stonework to create a natural fire barrier around your home.

Fire-Resistant Plants

Although there’s no such thing as a ‘fire-proof plant’ there are many species that are considered to be ‘fire safe’ due to their resistance to drought, low flammability, and minimal production of needles and ‘dead heads’ that can act as fuel for a wildfire. Some examples of fire-resistant plants include:

  • French Lavender – Not only will this low-lying, drought-resistant plant help you conserve water, but it’s deep purple flowers and inviting scent will add beauty to any yard.
  • California Fushsia – This deer-resistant perennial shrub can survive on very little water once it’s established, making it a great addition to any low-maintenance fire-resistant landscape.
  • Aloe Vera – Aloe vera plants great to have on hand to treat minor burns and they’re also are a good choice for firescaping applications. As a medium-growing succulent perennial, aloe vera reaches heights of about two feet and needs very little water to survive.
  • Coyote Brush – A California native, coyote brush is a dense, bright green ground cover plant that spreads up to six feet and can grow from 8″ to 24″ high. It’s a good choice for covering banks and other sloped surfaces.

Fire-Resistant Landscaping Materials

Generally speaking, it’s a good idea to eliminate all flammable hardscaping and building materials from your yard, such as wood chips, wooden fencing and planters, and even wicker and wood furniture. Here are some ways to integrate fire-resistant materials into your landscaping:

  • Use bricks, concrete blocks, or boulders to create walls around the outside of your lawn
  • When building a raised patio or deck, consider using flame-resistant engineered boards and metal instead of cedar or another type of wood
  • Integrate decomposed granite, sand, and rocks into your landscaping to create visual interest while keeping flammable materials to a minimum

Other Important Tips

  • Consider creating a gravel perimeter around the fence line on your property if space permits – this will serve as a ‘fuel break’, making it difficult for an active fire to move close to your home
  • If you keep firewood to fuel a fireplace, pizza oven, or outdoor fire pit, be sure to store your wood a safe distance away from your house – the same applies for LP tanks
  • During dry spells, consider using a manual reel mower instead of a gas mower – this eliminates the risk of sparks or oil leaks that could ignite a fire on your lawn
  • Keep overhanging trees trimmed back at least 15 feet from your roof line
  • Don’t plant trees below power lines
  • Keep your yard raked and clear of organic material that can serve as fuel for a fire
  • Always keep a garden hose connected and ready to use at every outside faucet

Posted in: Landscaping

Leave a Comment (0) →

Succulents: Ideal Indoor Plants

Succulents are plants with fleshy leaves that can come in a variety of colors. They are part of the same family as the cactus, and they can even be found on cacti in the wild. Succulents are excellent indoor plants because of their hardy nature and their colorful look. If you want to start planting succulents in your home to add color to your decor, then you should become familiar with the best ways to care for them.

Hardy and Soft Succulents

If you plan on planting your succulents indoors, then it helps to know the differences between hardy and soft succulents. Hardy succulents have thicker leaves and can survive in temperatures as low as -40 degrees Fahrenheit. If you live in an area with cold winters and want to plant in a window box or in a window display, then hardy succulents are ideal.

Soft succulents can survive in temperatures below freezing, but die out by the time the temperature gets to 20 degrees Fahrenheit. Soft succulents offer a broad range of colors and sizes, which is why people like them for indoor planting. All succulents do well in temperatures reaching 90 degrees Fahrenheit, but temperatures that go beyond 90 degrees could damage your plants.

Potting Succulents

Succulents require plenty of room for their roots to breathe and gather water. Standard potting soil is too dense, so you will need regular garden soil in your planting pot. Succulent roots will rot if left for too long in water, which is why your soil should contain good drainage. Whittier Fertilizer offers products such as 3/8 pea gravel, white golf course sand, and pumice to create ideal drainage conditions. A ratio of 2/3 drainage material for every 1/3 of soil is ideal for succulents.

Unless you are an expert at caring for potted succulents, you should always use a pot with a drainage hole. Succulents will look great in any kind of novelty pot, but you must allow for water drainage if you want your plants to survive. As your succulents get bigger, you can trim their growth or move them to a larger pot with ease.

Caring For Succulents

Succulents can sunburn and die if exposed constantly to direct sunlight. You can either place your pots in a place where the sun offers limited exposure, or move your pots out of the sun halfway through the day. Succulents prefer standard room temperatures, but any species can tolerate a temperature drop to freezing.

Do not over-water your succulents, and watch for pests. Potted succulents tend to be attacked by mealybugs, but you can spray your plants with a combination that is 70 percent alcohol and 30 percent water to protect them. Water your succulents at least once a week, but do not add water until the soil feels dry. If you keep your home at a warmer temperature, then you may need to water more than once a week.

Identifying Problems

If you see the leaves of your succulents starting to take on a darker tone, then you are giving them too much sunlight. A good rule of thumb is to only expose your succulent plants to 50 percent of the available sunlight on any given day.

It is important to remember that succulent roots absolutely hate being wet for an extended period of time. Some people use clear containers specifically so they can monitor the health of the roots. If you see the roots turning black, then stop watering your succulents so often. If you cannot see the roots of your plants, then look for your normally sturdy plant leaves to start going limp. That is a sign that you are drowning the roots.

Succulents are great for indoors because they require little maintenance, but they add plenty of color to any home. Buy a hardy succulent and see how well you do with caring for it to see if you are ready to introduce your home decor to the color and personality of succulent plants.

Posted in: Gardening, Landscaping

Leave a Comment (0) →

How To Get Rid Of Moles

how to get rid of moles
Moles are an enigma for gardening enthusiasts and people who love to keep a nice lawn. While moles do their part to aerate the soil and remove plant pests from your yard, they also like to create holes all over the place that can be unsightly and even dangerous. As with any other lawn pest, the best way to take care of a mole problem is to understand what you are up against and know the best ways to handle the situation.

How Do I Know If I Have Moles?

The two most common ways to tell if you have moles is if your garden vegetables are being eaten and your lawn has little volcano-shaped mounds all over it. Moles eat only insects and sometimes vegetables, which is both great and terrible for gardeners. You will be happy to know that moles are loners who rarely travel in groups, which means that you might only have to get rid of one mole to solve your problem.

You can be pretty sure you are dealing with moles if your volcano-shaped holes in the ground lead to what looks like an underground network of tunnels. Moles constantly tunnel underground to find food, and that tunneling can cause your lawn to collapse in spots. Moles are hard workers, so you will need to address the problem quickly if you want to save your lawn.

What Does A Mole Look Like?

A mole is anywhere from six to eight inches long and is covered in brown or gray fur. It has a long snout on the front, and its front and back paws have what look like human fingers with long claws on them. At first glance, it can be almost impossible to see a mole’s eyes and ears, but rest assured that they do have both features.

How Long Does The Average Mole Live?

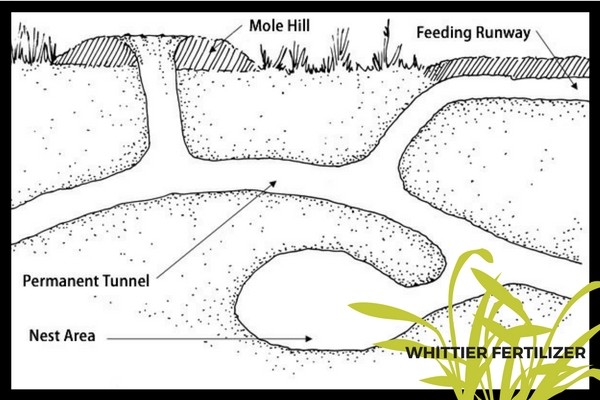
In the wild, a North American mole can live to be six or seven years old. Since moles do not eat many plants, they are not normally affected by the chemical pesticides used to keep out bugs. But if a mole does wander into a yard that uses chemicals, then its life span decreases significantly.

Why Do Moles Live In People’s Yards?

Moles eat approximately 80 percent of their body weight in bugs and larvae every day. Your finely kept lawn and well-fed garden tend to have the kinds of food moles love. A mole will burrow its way around your yard indefinitely looking for food until you put a stop to it. When a mole chooses your yard it is nothing personal, it is just survival.

How Do I Get Rid Of A Mole?

Let’s examine the following options for getting rid of a mole:

  1. The first option, which is the hardest, is to simply catch the mole. You will need to be quick, but it is not impossible. Go around to all of the mounds the mole has created and either stomp the molehill down with your foot or tap it down with a shovel. Notice the direction of the holes and try to stand upwind of them because the mole can smell you coming. You will also need to stand perfectly still as the mole can hear your footsteps. When the mole pops its head out of a new mound, quickly dig into either side of the mound with two shovels. The shovels will trap the mole at the top of the mound, and you can put the mole into a box and take it miles from your home.
  2. A second option is to use a blend of organic repellent that seeps into the soil. Moles have a heightened sense of smell that they use to find insects. Using an organic repellent irritates their sense of smell and taste and quickly find another place to dig for food.
  3. A third option is to use a mole trap. First, find out if mole traps are legal in your state before you start setting traps. If mole traps are illegal, then use the humane method. If mole traps are legal, then get a couple of spring-loaded traps and put them in the mole’s tunnels. If you can determine the direction the mole is burrowing in, then that would be helpful. Set your traps and check them daily. After you have caught one mole, keep an eye out to make sure it was only a one-mole problem. If there are more moles, set more traps.
  4. The last option is to use poisons or chemicals to try to get rid of moles. Consult a professional if you are interested in this option as they can offer advice on what to use as using poison make you susceptible to killing neighborhood pets, doing damage to your lawn or garden, and getting arrested (if it’s not legal in your state).

Prevention

The easiest way to prevent other moles from using the tunnels in your yard is to spray a combination of two tablespoons of dish soap, one cup of castor oil, and one gallon of water into the tunnels. You can also purchase solar-powered mole-repelling stakes and place them throughout your yard.

Whittier Fertilizer Gopher Control Products

Posted in: Gardening, Landscaping

Leave a Comment (0) →

What Plants Grow Well in the Shade

If you want to plant a garden but you only have access to land that is constantly shaded, then you need some good advice on which plants will grow in those conditions. Apartment dwellers can sometimes live in areas where the sunlight never reaches them, or many people have backyards that are permanently shaded by trees. Another common issue for gardening enthusiasts is only being able to plant alongside of a building that keeps the garden in the shade all day long.

Luckily, there are several types of plants that can grow in the shade, and others that thrive on only partial sunlight. Before you give up on your dream of a beautiful garden, we recommend checking out these plants and giving them a try in your dark growing environment.

PLANTS THAT GROW IN FULL SHADE

Contrary to popular belief, mushrooms are not the only plant (or fungus) that grows in full shade. There are several types of flowering plants that enjoy the cooler and darker environment created by shade, and they can be brought together to create a beautiful garden.

Jerusalem Sage
– One of the more popular shade plants is a flowering plant called Jerusalem Sage. It can be found in yellow or purple, and it usually grows in groups. This is the ideal plant for lining your walkways, or giving color to different parts of your garden.

White Trillium – White Trillium is a wildflower accustomed to growing in dark forests, which is what makes it so hearty. It has broad, white petals and dark green leaves that make this flower stand out in any arrangement.

Lily of the Valley – If your garden is in the shade and restricted by a small footprint, then the Lily of the Valley is an ideal solution. This popular plant has large green leaves with yellow accents and small white flowers that can add character to any garden.

PLANTS THAT GROW IN PARTIAL SHADE

Most of the wildflowers that have become popular can grow in any kind of shady conditions because they are used to the intermittent light of the forest. There are plenty of great plants to choose from if the sun only makes a temporary appearance in your yard each day.

Hydrangea
– Hydrangea bushes actually prefer shade during the hottest times of the day, and they reward your garden with blasts of white flowers set in deliberate bunches.

Amethyst – Amethyst flowers are the purplish flowers most commonly seen in hanging baskets. These flowers require a minimal amount of sunlight, and can look great anywhere in your garden or landscaping.

Begonia – The Begonia offers a vibrant flower with a yellow center that can survive in almost any type of shade. You can choose from a variety of colors with the Begonia, and they can grow anywhere there is fertile soil.

WATERING YOUR SHADED PLANTS

Watering shaded plants is tricky because the shade tends to slow down the evaporation process for water, and the trees that cause shade can provide extra water as the dew arrives in the morning. Do not put your shaded plants on a regular watering schedule as you could give them too much water and drown them. The best approach is to check each day to see if the soil is getting dry and only add water when there is more dry soil than moist.

If you have to contend with shade in your gardening area, then all you need to do is find the right plants to make your garden complete. There are many different types of plants that can survive in varying amounts of shade to help make your garden beautiful.

Posted in: Gardening, Landscaping

Leave a Comment (0) →

How to Care for your Sod

The process of properly caring for sod starts the moment it is installed. The first few months are critical to making sure that your sod takes hold and becomes a lush and green lawn. The clock is ticking the moment you sod is laid down, so it is important to know what you need to do at each stage of the life of your new lawn.

First Two Weeks

The first two weeks are critical as it is important to water your sod at least three to five times a day until it is spongy to the touch. You need to get at least four inches of penetration from your sod to the soil when you water, and you can measure that penetration by carefully lifting a corner of a sod segment to see how deep the water is getting. You need to keep this process up for at least seven days, and it may require a full 14 days of watering for the sod to take hold.

If the weather is hot and dry where you are, then a sprinkler should be running several times each day to keep the sod constantly wet. If the sod is not kept wet during this period, then it will dry out. Avoid walking on your new sod as you will leave footprints that will become a permanent part of your lawn. When the two weeks is up, you can allow your sod to dry so that it can be mowed.

Heading Into The End Of The Month

As the third week approaches, you can reduce your watering frequency to between one and three times a day. You can try to skip a day in between watering, but go back to watering every day if your sod starts to dry out.

When you start getting into the end of the first month, you should put a day or two in between watering days. It is important to split up your watering into two segments separated by one hour of waiting time. This allows the water to penetrate to the new root system, which has created a denser soil underneath.

The Next Five Months

You will need to monitor your new sod closely for the first six months of its life. After the first month, you can reduce the number of days you water to two or three each week, and you can also reduce how much water you apply. But you need to keep a close eye on your sod to make sure there are no brown patches. If you see drying sod, then you will have to water. After six months, your sod should be a lush lawn that needs the same amount of water as any other standard lawn.

Mowing

In most cases, you will be mowing your sod for the first time after the second week. But the best way to judge when to mow your lawn is how tall it is. Once your lawn reaches 3-1/2 inches in height, it can be mowed. Do not try to mow your lawn until it has reached that height or you could cause permanent damage.

As your new lawn settles in, be sure to add product when needed such as GreenAll Sure Start fertilizer or EB Stone Organics Sure Start fertilizer. The first two weeks of a new lawn’s life are crucial, so be sure to monitor your sod and do what you need to do to give it the chance to take root.

Posted in: Gardening, Landscaping

Leave a Comment (0) →

Make the Most Out Of a Small Backyard

Your backyard can be a haven from the world, offering greater privacy than the front yard. It is a place where you can enjoy nature without having to venture outside your total comfort zone. Whether you are an outdoorsy person or just enjoy stepping outside for a few moments, there are ways to optimize your backyard space for beauty, fun, and entertainment. These tips will help your backyard look more spacious and even a bit bigger!

Set Up a Separate Vegetable Garden

Create a squared off vegetable garden. Having a few separate sections of a small backyard can help you feel as though you have a larger outdoor space. It’s important to have big aspirations for your garden, but make sure that you start small on every level. Focus on the vegetables that you most want to grow, while also considering what is easy for a beginning gardener and what grows best in your climate. Whittier Fertilizer’s GreenAll Tomato & Vegetable Food can help the garden thrive by providing humic acid, micronutrients, and slow-release nitrogen to your plants.

vegetable gardens for small yards

Add a Lovely Depth of Vision

One way to really get a double view of the beautiful yard that you have crafted is to hang vintage, decorative mirrors on the back of your hard. Not only will these mirrors show off the gardening you’ve done, but they also reflect the beautiful greenery of your yard. The mirrors essentially make your outdoor space seem larger by reflecting the beauty that is already there. You can just add a couple or go big and add several to cover much of the back of your home. It’s a great “shabby chic” addition to the backyard, and kids will really get a kick out of the reflections.

add a mirror to enlarge a small yard

Remember That Less Is More

When you have a little space, it can be tempting to fill it up as much as you can with things to enjoy. However, instead of filling your backyard with a lot of furniture, playground equipment, and other items, it’s important to consider that less is nearly always more when it comes to small spaces. Keep the clutter at bay. Kids will be more likely to enjoy the open space of the yard than toys that are too crowded. Likewise, entertaining guests is much easier when there is more room for them to move around and enjoy the natural beauty of the yard.

Take Scale Seriously

When you have a small backyard, you don’t want to put big pieces of furniture in it. That would only make the space feel even smaller. Instead, opt to plant small bushes over big trees that could potentially overtake the yard. You may opt to focus on grass and gardens instead of trees and bushes in a small space. Your landscaping should be proportionate to the space at all times. Simple gardening tools and equipment from Whittier Fertilizer can help you achieve that goal.

Finally, keep in mind that your imagination should be your guide. When it comes to landscaping your most personal spaces, it’s okay to do it your way. Let go of preconceived notions of what a backyard is supposed to look like and go for what you truly want yours to be. Whether you are envisioning hours of gardening or joyful moments of watching your kids, landscaping products from Whittier Fertilizer can help you achieve your backyard goals.

Posted in: Gardening, Landscaping

Leave a Comment (0) →
Page 1 of 2 12